Have you ever listened to a great mix and wondered how the vocals were upfront and in your face, had tons of attitude and at the same time still sounded natural and relatable?
Many times, the secret behind that was Parallel Processing aka Parallel Compression.
The beauty of Parallel Processing lies in the simplicity of the concept.
At the core of it, here’s what Parallel Processing is about – let’s take a Lead Vocal-track for example:
1. Duplicate your original vocal-track, so it plays back on two audio channels.
2. Leave the original version untreated (= no plug-ins), but treat the shit out of the duplicated track, e.g. compress it hard, add frequencies that give the vocal some attitude (just as an example – add whatever you’re after). While you’re treating the duplicate, mute the original, and have no mercy – go to extremes with the treatment, to the point where you couldn’t use the signal in the mix on it’s own.

3. Turn the duplicated track fully down, then carefully start blending it with the untreated original by slowly bringing the fader up. Use this the way you would add sugar and salt when cooking – it’s about subtly pushing the original signal in a certain direction without affecting it’s integrity and natural dynamics.
That’s really easy to do, right?
Congratulations, you’ve just learned Parallel Processing.
Duplicate the track you want to compress.
Compress the shit out of A, leave B clean. Mix.
HOW TO CHECK IF YOUR DAW SOFTWARE CAN DO THIS
The technique of Parallel Processing aka Parallel Compression was first used in the internal circuit of Dolby A Noise Reduction (introduced in 1965). In 1977 it was first described by Mike Bevelle in an article in Studio Sound magazine, and later dubbed “New York Compression”, around the time when mixing consoles started to feature an extensive routing matrix.
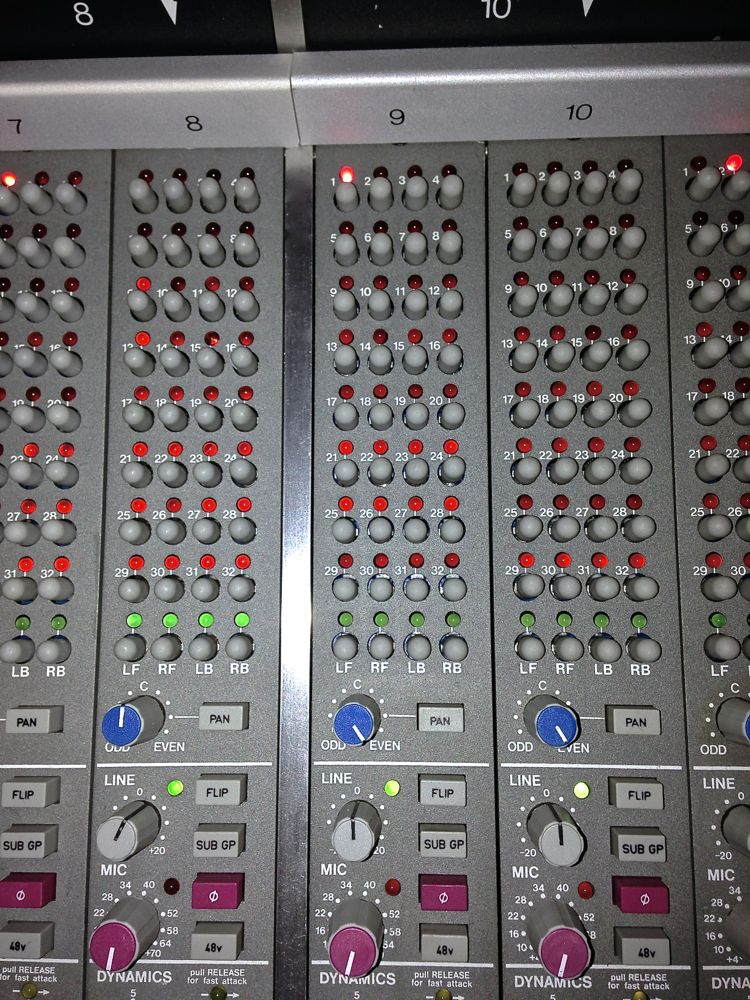
On the SSL 4000 E/G-Series, which was first introduced in 1979, you simply press any of the channel’s routing buttons, for example Ch. 1 (like shown below on Channel 9) and get a duplicate of your signal through the large fader on the channel you just selected (by choosing Subgroup on that Channel as your input source).
WHY DOES THIS NOT WORK ON MY DAW???
While duplicating a track is something you can do in every DAW, early DAWs had issues with Parallel Processing. People still have trouble with it on some platforms, but it works great in Logic Pro X and most others, and I’ll guide you through the necessary changes in the audio preferences.
Here is the problem:
Every plugin you’re adding to a track adds a tiny delay to the signal. Time required for the plugin to calculate the audio.
BUT: your DAW has settings in the Audio Preferences that will make sure the software is compensating the exact delay that the plug-ins create – what they do is starting the audio of a track that has a lot of plug-ins ahead of the others, so it comes out exactly in time…
If those calculations are not precise, Parallel Processing won’t work, as you’ll get phase cancellation between the two similar signals you’re mixing.
Even a tiny delay of one sample will render the technique useless!
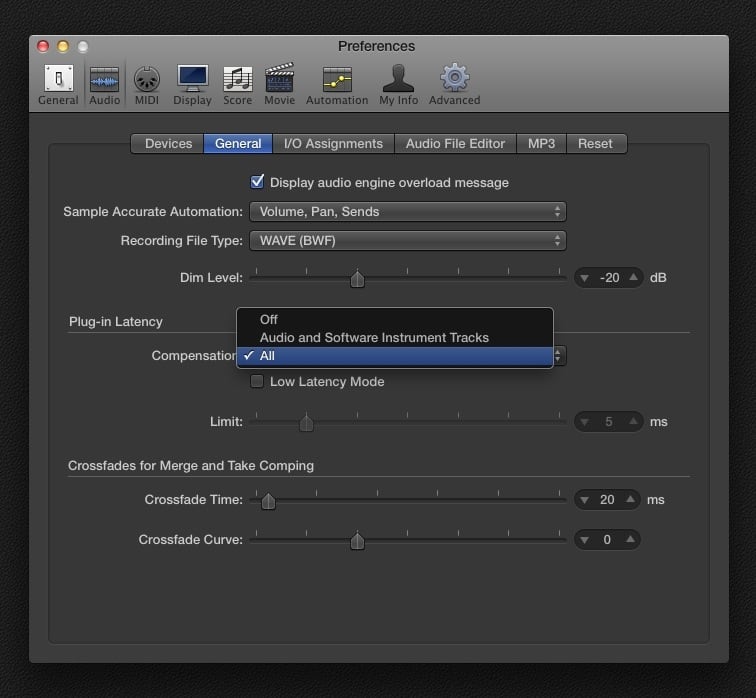
Today’s DAWs have a feature called “Plugin Delay Compensation”, and you need to make sure it’s activated:
To take Logic as an example, we have 3 options for the “Plug-in Latency Compensation”, as Apple calls it:
1. Off
(no compensation)
2. Audio and Software Instrument Tracks
(compensates Audio and Software Instrument Tracks, but not Auxes or Output Objects)
3. All
(compensates everything)
I usually use the „Audio and Software Instrument Tracks“-Option during Recording & Arranging, and switch to ALL when I’m mixing.
The software will now fully timealign ALL Audio Tracks, Software Instruments, Aux Busses and Outputs.
Which means that I can use an Aux to send my Original Signal to another Channel Strip, and treat that signal like the duplicated track in the example above. Very similar to how you would do this on an analogue console.
Of course, the analogue console does all this without any latency. Which means, you can use all these tricks even during a live recording.
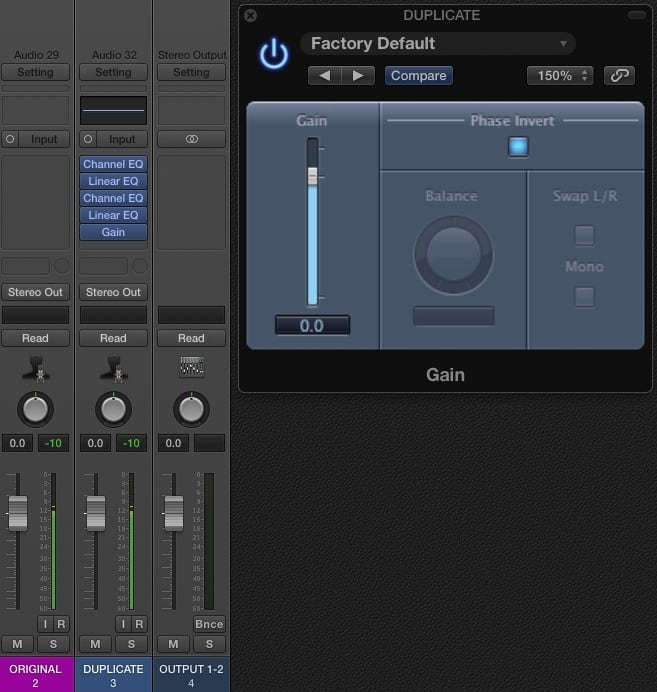
To assure that you’re on the safe side, you can do a test with your DAW software. Add a bunch of EQ plug-ins to the duplicate track, but do not EQ the signal (leave the EQs switched in but flat), and invert the phase polarity on one of the tracks – in the picture below I’m using Logic’s “Gain”-plugin:
As you can see, the result of playing two similar tracks back (one of them with inverted phase) should be silence on the output – when you reverse the polarity on one of two similar audio tracks, they cancel each other out.
“The concept of Parallel Processing is to design two or several signal chains of the same source
that go for different aesthetic goals”
THE PHILOSOPHICAL DIMENSION
Parallel Processing is the solution to a problem that I remember experiencing with compressors since the first time I used one in the 80s (a cheap dbx 163X):
1. on extreme compression settings, the signal has great punch, tone and attitude, but at the same time you really can’t use it like that, it just sounds too manipulated and processed.
2. without compression, the audio sounds clean and natural but lacks punch and attitude
Parallel Processing takes some weight from the mix engineers shoulder – by separating the clean and compressed audio, the audio-source becomes easier to manage.
You start to take more risks during your mix – you can just experiment on an additional parallel-chain for fun. If it doesn’t work – throw it away!
You never feel like you’re messing with the original signal.
PARALLEL PROCESSING ON VOCALS
On the first example, at the beginning of this article, I left the original signal completely untreated. That was of course an extreme example to illustrate the principle of parallel processing. While you might not use any compression on your clean (original) signal, you still want to make sure the audio delivers a consistent performance.
Never use a parallel chain to be a substitute for automation or other audio housekeeping.
Use automation for parts that drop too much in volume, and never forget to do the necessary EQing / filtering (like removing low end rumble or doing some DeEssing).
The concept of Parallel Processing is to design two or several signal chains of the same source that go for different aesthetic goals – here are some ideas:
A – treat for uncolored, natural, dynamic
B – treat for extreme, coloured, saturated, or even distorted
Of course, you can create even more duplicates of your signal that are differently treated – some examples:
C – run through a guitar amp plug-in for distortion
D – separate breathing noises from the actual „tones“ in the vocal, and keep as untreated and natural as possible (use automation to level bits that jump out)
E – create a duplicate specifically to send to Echos and Reverbs
I like to think of Echos and Reverbs like a blurry shadow on a photography – hence DON’T send to them from your „upfront/punchy“ vocal channel. Create something more cloudy/blurry that has a stark contrast to your direct vocal signal.
PARALLEL PROCESSING ON DRUMS
I gave you plenty of ideas in the recent article on „Mixing Kicks“. Just a few examples:
– create a duplicate to bring out the transient
– separate the duplicates into different frequency ranges
– use a duplicate to bring out harmonics (check my post on that)
Try sending your entire Drum Submix to a Parallel Compression Chain. This can give your drums great stability in the mix, while transients are unaffected.
This was the second part of my thoughts on Compression – if you missed Part 1, check it out here.
[convertkit form=5236308]


