VCA Faders – Balancing the balance.
Balancing the instruments of your song is the essence of mixing. You have a bunch of faders – one for each instrument – and you move ‘em all to a position where your mix sounds great. Easy, right?
Well, in theory, thats correct – but there are a bunch of issues that are in the way, such as the following ones, all of which can be resolved by the use of VCA Faders and Groups.
Different setups, different problems, same solution.
Just a few examples of where VCA Faders and Groups can provide help:
• “I don’t even have a mixing console. I do this all in the computer with a mouse.”
• “I have a DAW controller with faders, but there is always more tracks than faders.”
• “I have the largest SSL console available. But fader 1 and 96 are too far apart. And I only have two hands.”
• “The further I progress with my mix, the louder the mix gets, often to the point of distortion. At that point I need to pull all of them down by the same amount. As I’m trying this, the balance also ends up different and I have to start over again.”
Introducing VCA Faders – structure for your mix.
A quick example. You can start a mix by balancing only your drums, then assign all of these drum instruments to the same VCA Fader. Now you are able to control all of the drums with just one fader. The balance you have set will stay intact, and should you need to turn an individual drum instrument up or down, you can still do that, at any time.
As a next step, you might add various synthesiser sounds – pads, a lead riff, some melodies – until you got a good balance. The synths are communicating well which each other but once you add vocals you find that the synths are too loud and the drums are collectively too low. At this point you control each group consisting of drums, synths and vocals with just ONE VCA fader each. It definitely makes the mixing process a lot easier.
Here’s a quick video of VCA faders in ProTools 12.
If you work with Avid ProTools, Apple Logic Pro X or Steinberg Cubase 8, your DAW has “VCA Faders” or “VCA Groups”. All of these DAW programs have added VCA Faders to the feature list in recent updates.
The confusing thing is that earlier versions of Cubase, Logic and ProTools had features that looked similar, but didn’t provide the exact same feature-set as VCA Faders. In other words – the software makers didn’t get it quite right the first time around, and they’re now fixing an old mistake.
Unfortunately this shows that the inventors of these programs didn’t really get input from professional mix engineers in the beginning. Ask any pro who has worked with a large analogue console – VCA Faders and Groups were one of THE BIG advantages these always put them ahead of mixing “in the box”.
Like many features we enjoy in todays digital DAW world, the functionality of VCA Faders go back to an invention from the analogue world which was essential to the development of early synthesizers like the Minimoog. To fully understand what is going on, let’s get into the details of the underlying analogue technology.
VCA Faders
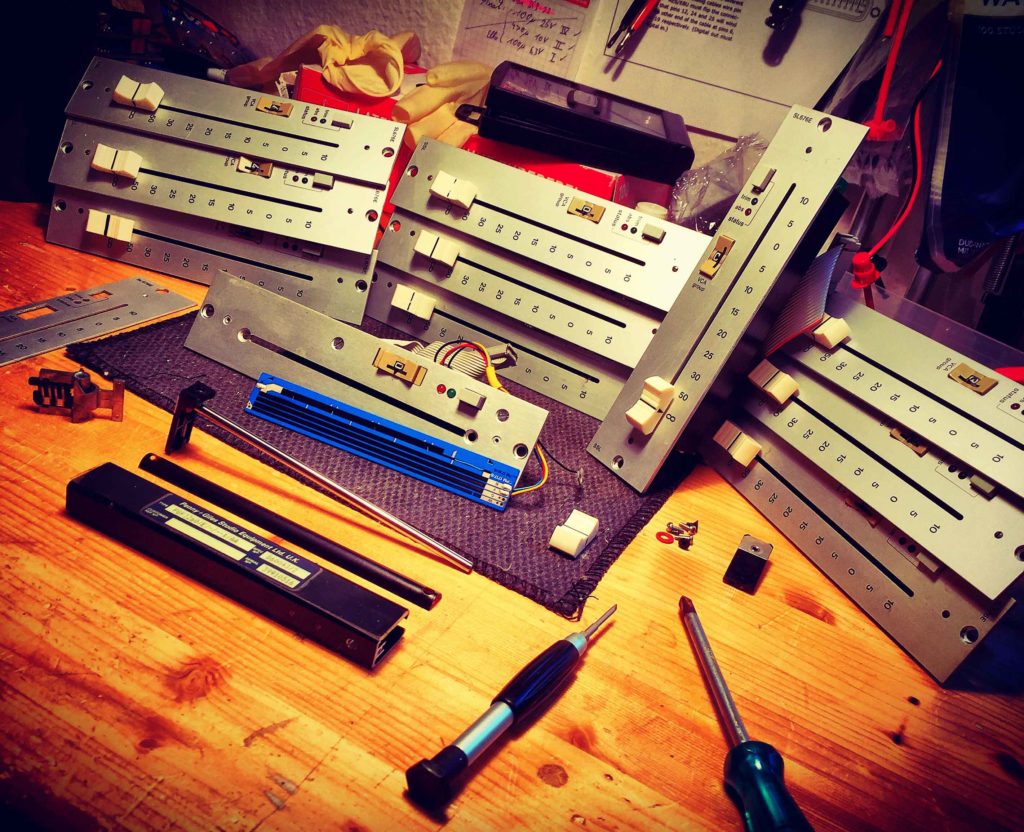
On a classic E/G-Series SSL-Console, EVERY large fader is a VCA-Fader. Audio NEVER passes through the faders – the faders just send a control voltage for the VCA, which can also be recorded to the mix computer in real-time. The mix computer essentially has an A/D and D/A converter which translates and stores the changing voltages for each SMPTE frame of the music’s timeline. Similar to what a DAW does today – only that it records control-voltages instead 24bit audio – not bad for a 1977 computer, right?
VCA Groups
In addition to a fader for each channel, the classic large SSL consoles always had 8 extra faders that control 8 VCA groups. Each large channel fader could be assigned to one of these 8 groups which would (via the VCA group fader) act as a master control for all the channels assigned to each VCA group. Again, no audio signal ever passed through these faders – all they do is provide a control voltage that controls the voltage of the channels according to how they are assigned to the 8 available VCA groups.
But there’s a super-tricky thing the SSL console developers invented for the VCA group faders… when the group fader is set to default (= 0dB), they add 0V to the VCA circuits of the assigned groups. If you turn the VCA group fader higher, it adds voltage (= volume) to the channels, if you turn the VCA group fader lower than 0dB, it sends a negative voltage which means it subtracts from the control voltage so all assigned VCAs reduce their relative volume by the same perceived amount. Very simple but effective!
VCA Trim
The use of VCAs in analogue consoles would solve another very common problem every user of analogue consoles would frequently run across. Remember how you sometimes end up pushing all faders higher and higher, and at one point overload your master bus?
This is where the “VCA trim” comes into play… it’s basically just one knob that globally adds or subtracts voltage to ALL VCAs in the system.
When to use what.
Audio Subgroups
The most basic audio subgroup every mixer and DAW software has is the Stereobus.
But more commonly, we associate audio subgroups with a routing where a number of tracks are submixed before these different groups get summed together in the Stereobus.
Audio Subgroups are great for situations when you want to “glue” various elements together with processors like compressors and saturators, or you want to apply similar reverbs on all of them at the same time. A Drum-Subgroup is a great example for the “glue”-situation, where as a subgroup for Backing Vocals is very convenient to add the same kind of Reverb FX on all of them at once.
If all you want to do is have one fader for ALL the drums, or ALL the vocals, but your not planning on any “group” processing, you’re better off using VCA Faders.
Fader Groups
When several faders in your mixer are “linked”, many DAWs call this a “Fader Group” or “Fader Link”. The individual faders can have different levels, but they are all linked. When you bring one fader up, the others are brought up as well, proportional to their original settings.
Many early DAWs had this feature, but as soon as you wanted to change one of the faders within the group, but not the others, you had to temporarily remove this one fader from the Fader group, change the level, then add it to the group again. Which is of course doable, but not convenient and definitely preventing “intuitive” changes “on the fly”.
VCA Faders
VCA Faders are very similar to “Fader Groups” with the only difference being that you can change the individual level of every fader at any time while they still remain linked to the “fader group”.
How to create a VCA-Fader stack.
Logic Pro X
Select the tracks you want to group to a VCA fader. Then use „Create Track Stack“.
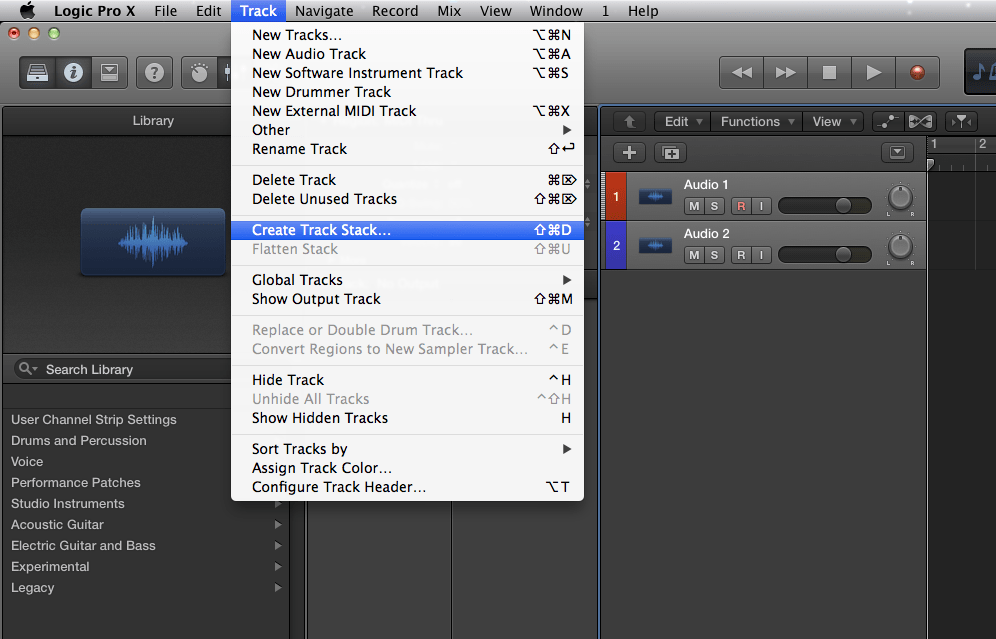
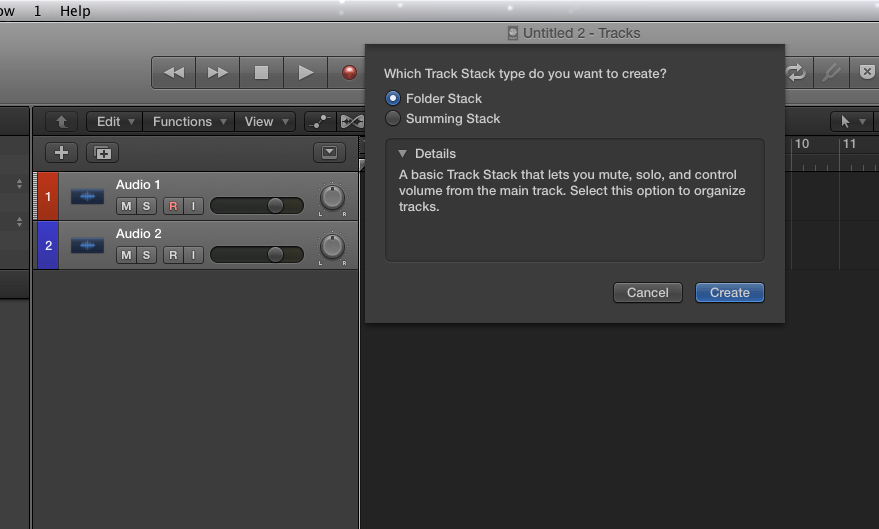
Now you pick „Folder Stack“ for the VCA function.“ Summing Stack“ will create an extra bus for summing.
ProTools 12
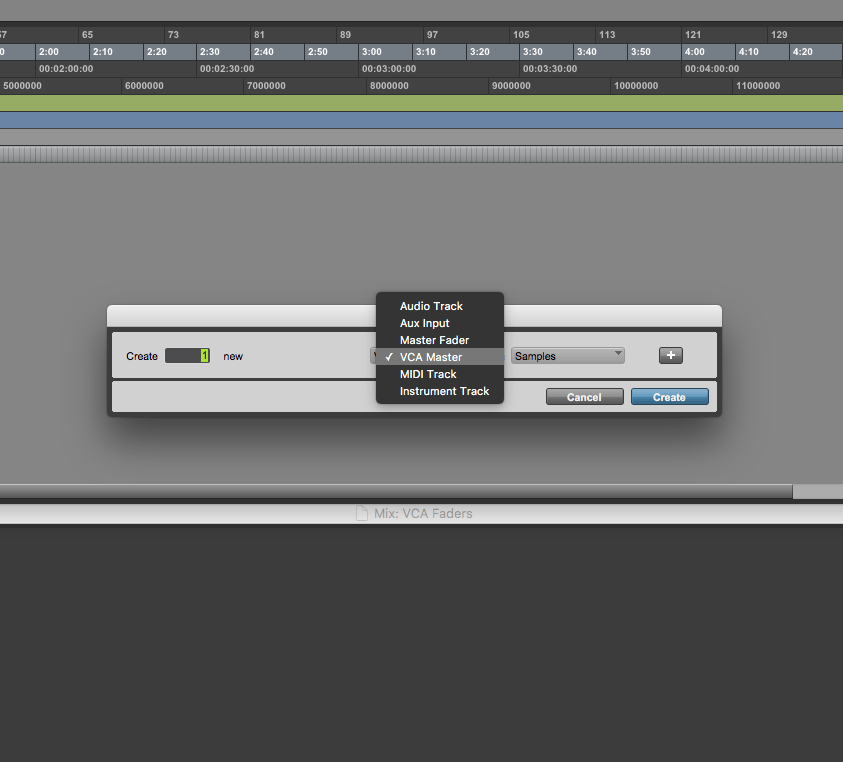
First you have to create a new track.
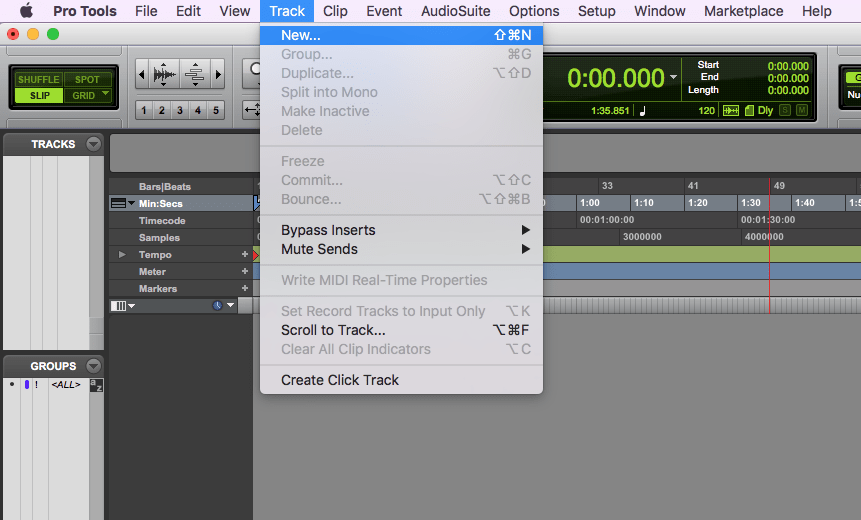
Select „VCA Master“ to create a new VCA fader.
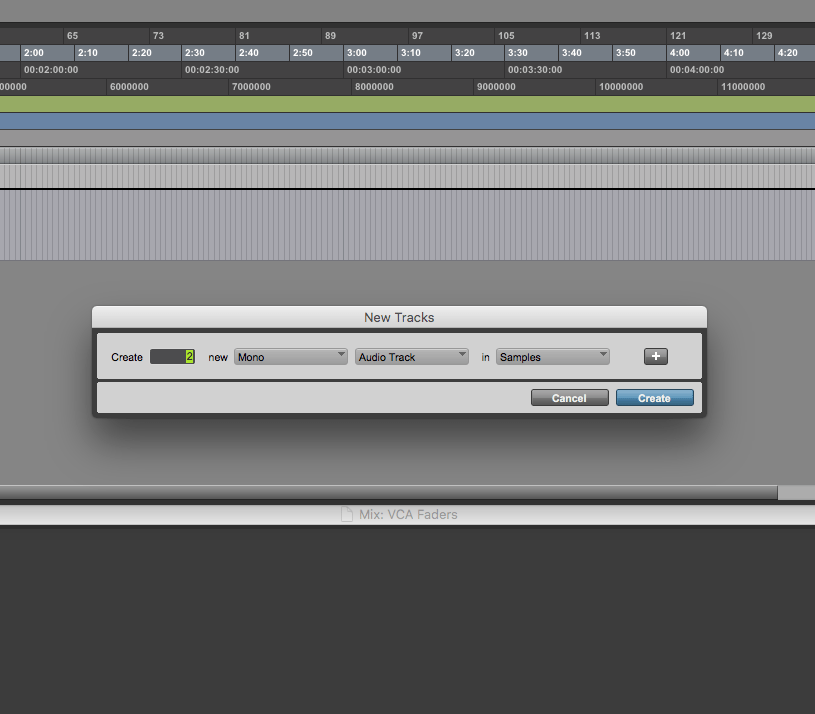
Then you can add audio tracks to you session.
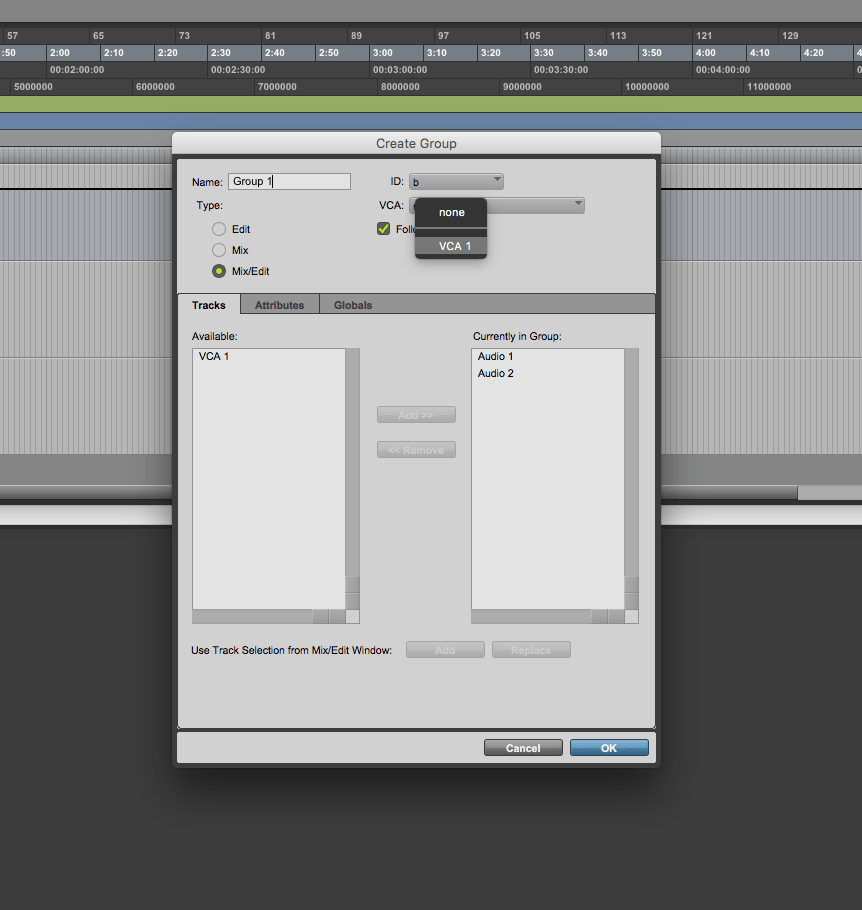
Finally group them to the VCA fader you already set up.
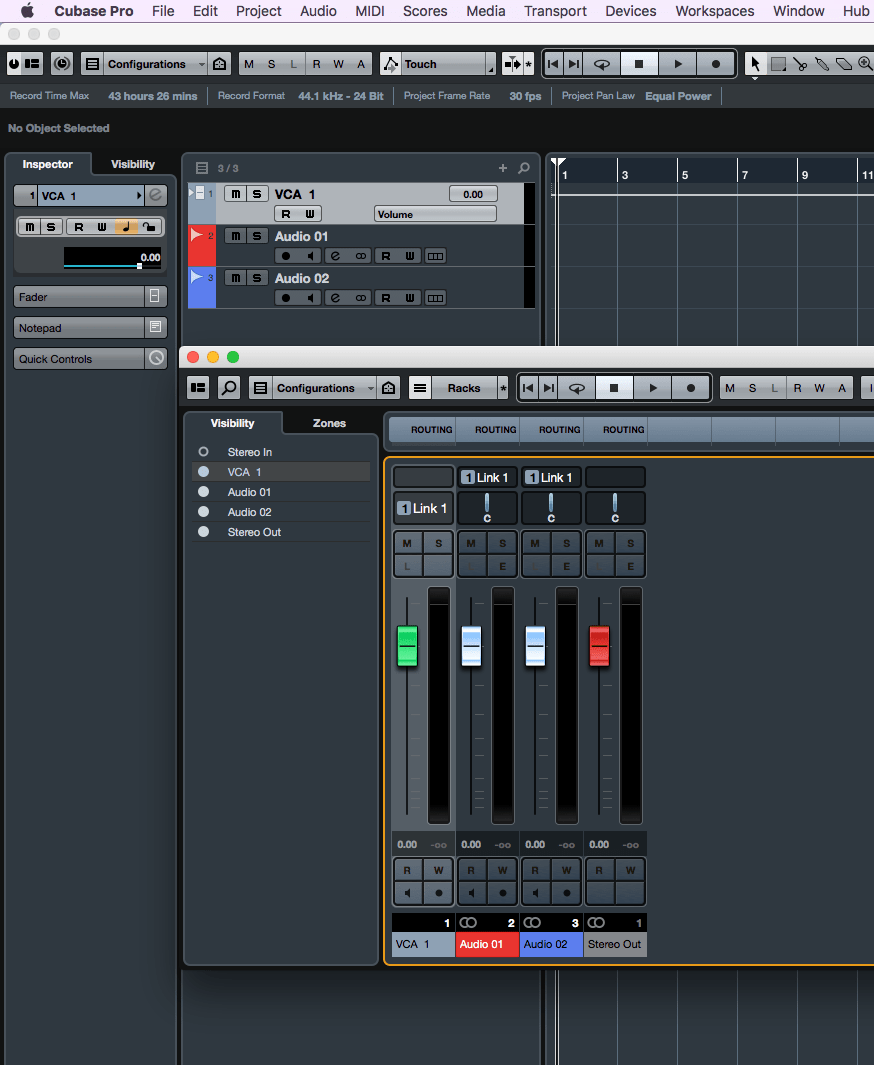
Cubase 8
Open the mixer window and select the track you want to group to a VCA fader. Then right-click on them and pick „Add VCA Fader to Selected Channels“.
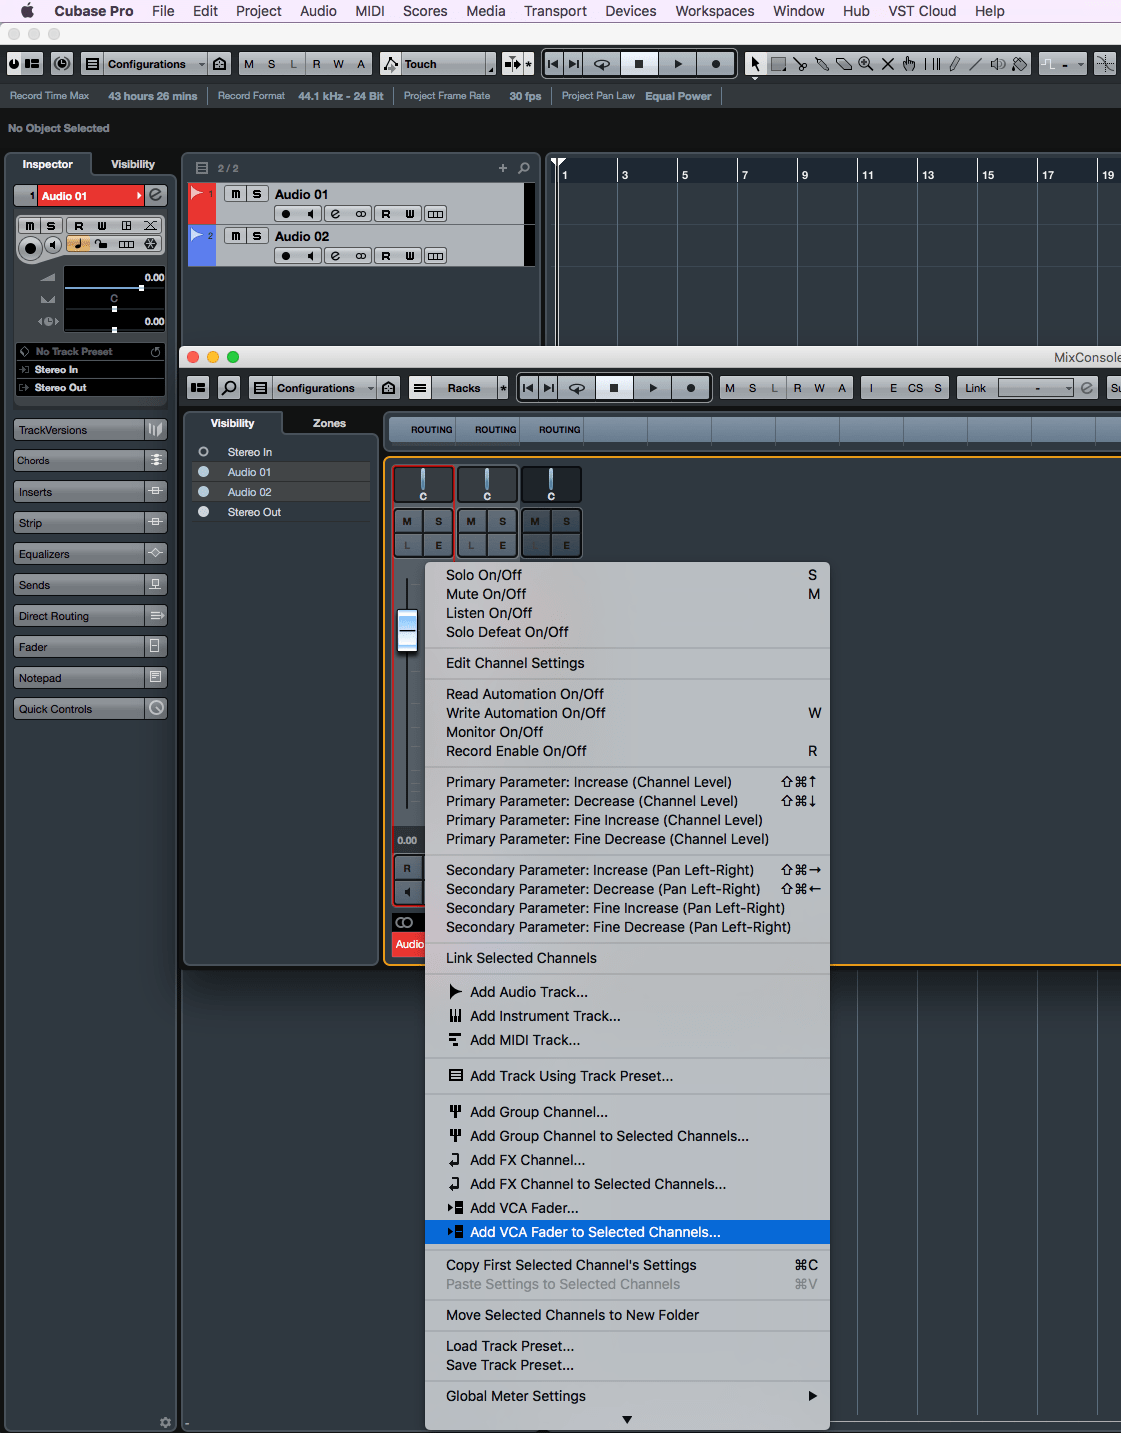
The new VCA fader will control the selected tracks now
If you found this post helpful, check out my bestselling book which will guide you through the entire mix methodology from DAW preparation to mix delivery, the eBook YOUR MIX SUCKS. It’s currently still available at introduction price.


