Today, I want to pick your brains about using Reverbs and Delays.
Most producers have a basic set of Reverb/Delay Sends and Returns in their DAW sessions: a standard reverb (mostly on a 3 sec plate or concert hall setting), a delay for throws (with feedback for repeating echoes), and maybe a small room simulation with early reflections. All the tracks in the arrangement are accessing the same reverb and delay, if needed.
Thats totally fine for arranging and producing, but forget that concept for most mixing-sessions.
I’ve called this post “Reverb Culture” as there is a million things to explore when it comes to reverbs and delays. The more you explore the subtleties of different types and colours of reverbs, you want to start using them in your mix.
You can use reverb to improve the “front – back” dimension in your mix, placing certain instruments more distinct on a virtual stage, creating contrast between the upfront/direct and the more unobtrusive elements in the mix, and much more – reverbs offer a microcosm of endless possibilities.
A little bit of reverb history
Hundreds of years ago, classical composers thought about how to set up the musicians on stage, and the traditional setup of an orchestra is arranged in a way that certain instruments have more room ambience added as they are further in the back. A good example would be brass and timpani, which are seated at the back of the orchestra, behind woodwind and strings – you wouldn’t want them to blast their sound into the first row of the audience!

Concert halls were designed and built for orchestral performances, and the first recording studios were modelled after concert halls. To this day, the “concert hall” setting is the most standard reverb you would add to a dry signal in a mix, adding the dimension of a natural sounding room to an instrument recorded with a close mic, or an electronic instrument that doesn’t come with natural ambience.
Not every recording studio had the size of a concert hall, just look at Motowns legendary “Hitsville U.S.A.”-studios, so in the 1950s all of them were looking for ways to implement artificial reverb and echo.
The first solutions were dedicated “reverb chambers” using the send/return approach we know to this day – you’re sending the signal for which you need reverb from the mixing console to a speaker in a “reverb chamber”, and one or several microphones pick up the “wet” signal which can be added to the dry signal via the (effect) return of the console. This is how Bill Putnam used it first in 1947 and of course his United Recording Studios had and to this day still have several great sounding reverb chambers.
The Hit Factory/Power Station/Avatar-Studio in New York (yes it kept getting new names!) had a famous five storey staircase which was used for reverb which shows you that the top engineers were always finding creative ways to implement room-sounds into their mix.
Got tape delay?
Analogue tape recorders were the first devices used to create echo aka delays: the physical distance between the magnetic record and playback-head of a tape recorder would allow to hear a signal from tape that was just recorded a fraction of a second before. By varying tape speed and distance between record and playback-head, almost any length of delay could be created (sometimes 2 tape recorders were placed away from each other for long delays).

Not to mention that by varying the speed of the tape recorder you could modulate the delay, and a variation of this technique would even create a double tracking effect for vocals which could create delays that arrived BEFORE the dry signal. So not every tape recorder in an ancient recording studio was a master recorder. Abbey Road in the 60s and 70s for example had batteries of recorders JUST for tape delays.
The short delay produced by the tape recorder playback head at high speeds was also ideal to create a pre-delay for reverbs. A little pre-delay would help to distinct the dry and reverb signal from each other, and is of course one of the important parameters to look into when setting a reverb in your mix.
Classic reverbs
A lot of creativity went into developing devices that would create reverb, and while some of them failed in creating a natural sounding reverb (spring reverb!), they all left their imprint on recording history, and we are sometimes after exactly these sounds:
• spring reverb (capturing vibrations of a metal spring via a transducer and a pickup; invented by Laurens Hammond in the 1930s and used in his famous Hammond organ)
• chamber reverb (using a soundproofed room, and first used by Bill Putnam in 1947, as discussed above)
• plate reverb (capturing vibrations of a large sheet of metal, made famous by German Wilhelm Franz of “Elektro-Mess-Technik” aka EMT in the 1950s)
In the 1970s, the first generation of digital reverbs was introduced, starting with the EMT 250 (1976), the Lexicon 224 (1978), AMS RMX-16 (1981), followed by many more, and brought to mass-market with reverbs like the Yamaha REV7. This first generation was refined in later units like the Lexicon 224XL, 480L, 300, PCM-60 and PCM-70, which are now considered classic reverb units. If you’re thinking about buying one of those – any of these units keep their resale value, but there are less than a handful people in the world who can fix these if anything goes wrong.

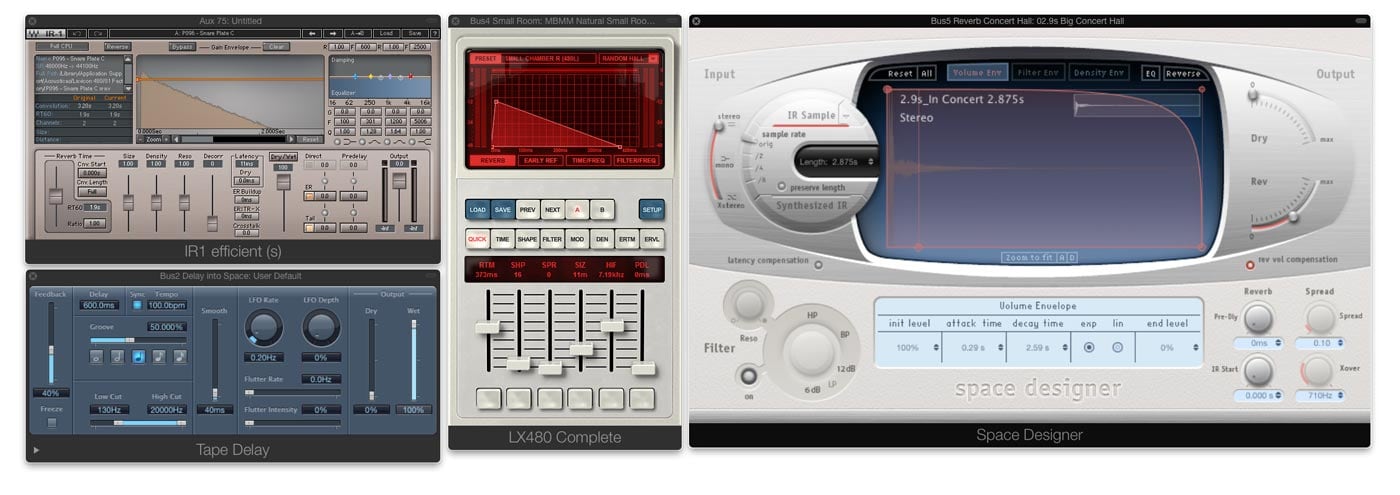
By the end of the 1990s, plug-in reverbs and DAWs were making a real impact on the market. Digital reverb algorithms were now implemented to plugins, and the technology of impulse responses makes it possible to record a “fingerprint” of a room sound, or any hardware reverb, and replicate it via an impulse response reverb plug-in. The most famous one is Altiverb, but these days many DAWs come with one (Logic Pro X: Space Designer, Cubase: REVerence).
While it is fun to work with original hardware, and there are also great algorithmic reverbs, you can cover most of your needs with impulse response reverbs, but you will of course have to build a library of great impulse responses, and learn how to use them.
Bricasti M7 – a 21st century classic
When nobody thought a “new classic reverb” was possible, two former Lexicon-engineers created the Bricasti M7 reverb.
Up to this point, the Lexicon 480L was the de facto “industry standard” for professional reverb. It’s successor, the Lexicon 960L, is very powerful, but had disappointed many people who got used to the 480L.
Along came the Bricasti M7, and most people pretty much immediately were sold on it. If you really want a hardware unit, this is the one to get.
Your setup for a 3-dimensional mix
The sound of any reverb is highly dependent on the sound source you feed it with. Don’t rely on the same “instant settings” for every mix. What you can do though, is to create a lot of options that can be accessed quickly. The CPU-power of modern computer DAWs makes it easier than ever to access batteries of different reverbs that are set up in a template and can instantly be accessed.
If you want to create the impression of a 3-dimensional mix, with lots of space and separation, here are some things to consider:
• you need a huge palette of different reverbs and delays, add to that some modulation FX
• the reverb you end up using in the mix with will be a mixture of several reverbs that differ in many ways, from colour and density to reverb time
• the most important tracks in your mix are accessing completely different reverb and delay sends and returns
• you need to have banks of different reverbs ready in your DAW template, specialized for different sources like drum room, snare, toms, lead vocals, pads, lead synth, orchestral instrument
• group the reverb returns together with the instruments they belong to – if you have a drum subgroup or VCA group, the reverb returns for the drums belong to that, and exclusively to that
• also, you don’t need to create a new send for every reverb – you can send, for example, to 20 different snare reverbs from „Send 5“, and then just unmute and mute them at the aux return, one at a time, until you find what you’re after; this is a very fast and intuitive process, and gives you the option to use one or several reverbs at the same time, and level their balance at the different reverb returns
• for subgroups or VCA groups to really work, FX belong mostly exclusively to their sources – if you mute the drum group, you mute all drum reverbs with it, but of course NOT the vocal reverb
• it’s essential to stay very organized in that respect
All of the above probably sounds like mixes that are drowning in reverb. Don’t be fooled – some of these can be very subtle. Also, don’t be afraid of long reverb times, but keep them super low in level. Many of these you only hear when you switch them off.
Here are some examples for types of reverbs that are useful to have at hand, all at the same time:
• most reverbs deliver sounds in traditional categories like plate, chamber, ambience, rooms, concert halls, church reverbs, etc.
• most classic reverbs (e.g. Lexicon 224, 480, EMT, AMS RMX) are great at less defined, „cloudy“ reverbs, regardless at which reverb time
• modern reverb plug-ins and hardware reverbs (Bricasti M7 is my favourite) are great at super-realistic room simulation
• plug-ins using IRs (Impulse Responses) can do both – IRs are basically just samples or „fingerprints“ of the original reverbs or even real rooms
What I personally have done over the years was simply try a lot of different reverbs and especially IRs, and everytime I heard something that I liked, I saved the channel strip settings, reverb, EQ and some compression, to a channel strip preset in Logic. Doing this will allow you to keep developing a goto library, and certain reverb chains you can not live without after a while, and these make it to your DAW mix template.
Flavours of Delays
Delays also come in many different flavours:
• the typical 1/2, 1/4 or 1/8-note delay „throw“, often used on the last word or syllabel of a vocal-line.
• short slap-back delay
• super-short microdelays to widen mono signals
• complex delays with polyrhythmic patterns, or even unpredicted „weird“ stuff happening in the feedback loop
Philosophical Considerations
Reverbs and delays are to your mix, what a shadow is in a photography, you don’t want them as sharp and shiney as your main object. Most of my delay returns are sending to reverbs as I don’t like them to be a totally dry „sampled“ copy of my original signal.
Look at reverbs (and delays) similar to a shadow in a photography, you don’t need them 100% upfront, shiny and dynamic, their purpose is to give you a sense of subliminal depth. Compressing them helps that a lot. I also EQ them contrasting to the direct signal for that reason, so if you’ve worked hard to make your lead vocal upfront, direct and “in your face”, you don’t want to send your reverb from that direct signal.
Compressing reverbs also makes them more controllable – you can get away with less reverb in the mix, if you compress the reverbs that you are using.
BTW, this is one reason why older “vintage” reverbs/delays are still popular – they have a low-res, “grainy” feel about them (example Lexicon 224 or AMS DMX1580). Same applies to the character of “tape delays”: because each feedback loop feeds the signal back to the tape head, the saturation effect of analogue tape is very obvious here.
Creating a three-dimensional sound

There are obviously a lot of small details involved, but for a start, get your head around the following concept:
important stuff goes to the center: Kick, Bass, Lead Vocals
try panning everything else hard left or right
Sounds crazy I know. Try panning a guitar hard left, send it to a small room and pan the room hard right. Now bring the reverb a tiny bit more to the center until it feels well-balanced.
The second guitar you might have: pan the dry one hard right, send it to another small room (or delay or chorus) and pan the effect hard left.
You get the idea… this works for guitars, keyboards, percussions, noise fx, etc. – I use small rooms/chambers/spaces from the Bricasti M7 reverb for that. There are Impulse Responses for the Bricasti out there – for free, and officially authorized by the guys who designed that reverb.
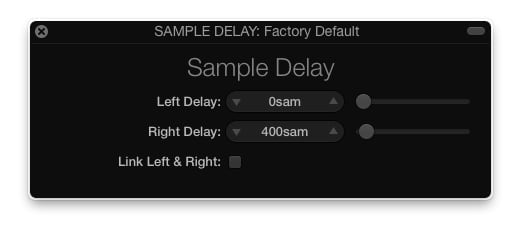
To spread stuff out, you can use a super-short delay on some instruments. Logic Pro X has a very useful plug-in called “Sample Delay” that is perfect for that.

Leave one side at 0 ms (original signal bypasses), for the other side try settings under 1000 samples (thats at 44.1k Sample-Rate), values from 300 – 800 work great. Check back and forth in mono, to make sure it doesn’t sound too weird or “phasy”.
Subgroups, FX Busses and Routing

As the number of different reverbs (delays, etc.) you are using grows, you need to keep the routing strictly organized. Using the same reverb on several sources quickly becomes messy. You might need to EQ or compress your main reverb in a certain way to improve its sound on the vocals, but as you have used that same reverb on other instruments you are suddenly affecting the balance and sound of your entire mix.
I know it sounds counter-intuitive, but you’re better off separating the reverbs you are using for the different instrument groups, which includes the routing and grouping. On my console, I have a pair of channels dedicated to vocal reverbs, another pair for drum reverbs, and they are assigned to their respective VCA groups.
On the drums use pre-fader sends, use the drum fx exclusively for drums, and route their returns to the drum bus as well, and/or put them on the same VCA group.
Same goes for parallel compression busses, the sends to them are pre-fader, not following automation, but the returns follow the automation of the source – I do that via the Drum VCA group – you get the added bonus that you can treat the FX returns for each group of instruments separately. We want total control in mixing.
If you found this post helpful, check out my bestselling book which will guide you through the entire mix methodology from DAW preparation to mix delivery, the eBook YOUR MIX SUCKS.
[convertkit form=5236308]


